Have you ever thought or been thinking about starting a website to make extra money? One of the biggest lessons I’ve learned by creating websites for people is that most people just don’t know where to start or are scared to death about all the technical part involved. So most people give up before they even start. Although we build turnkey niche websites for people to get started fast, I wanted to share how you can setup an internet marketing or niche website in 30 minutes or less.
Step 1: Choosing a Domain Name
 Choosing the domain name or web address of your niche website should be considered first and based on the niche you are considering. The domain name should contain the keyword or keywords of your niche. For example, you have chosen Fishing as your niche, then you might pick something like FishingTipsAndTricks.com as your domain name. Once you have made your decision you will need to register your domain name using a registrar like Name.com or GoDaddy. Sometimes hosting providers will offer this service as well.
Step 2: Find a Hosting Provider
When it comes to finding a hosting provider for your passive income niche website, the options are almost endless. This is not a complicated task but it can be a tedious one weeding through all the choices out there. The best way to select a quality web host is to make sure they have competitive prices, WordPress support (preferably 1-click install so there are no technical skills needed) and great support. A few examples of those would be HostGator, BlueHost and DreamHost.
Step 3: Installing WordPress
WordPress is one of the easiest content management systems available and is supported with thousands of plugins to do just about anything. WordPress is fairly easy to install on any server that supports PHP 4.3 or higher and MySQL 4.0 or higher. However, having a 1-click install interface will make it dead simple. This way just about anyone can be up and running in just a few minutes. Depending on the hosting provider, just follow the steps provided by them and you should be able to install WordPress in about 5 minutes.
Step 4: Configuring Your Website
Now that you have WordPress installed, you will probably want to change the default look of your website. There are thousands of free and paid themes available for WordPress. You can do a search in Google for WordPress themes to find one that suits your needs. Once you find the theme you like, you will need to download the zip file.
Installing the Theme
 To install any theme on WordPress is pretty simple. Log into your website’s administrator panel and click the Appearance menu item on the left hand side.
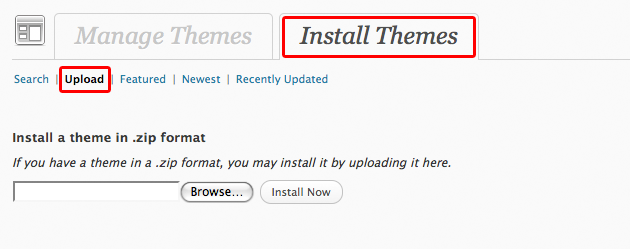
On the next page, click the tab at the top labeled Install Themes. Then under that click the Upload link.
From here you can Browse to select the theme’s zip file and click Install Now to upload and install it to your site.
If it’s not already activated, under the Manage Themes tab make sure to activate it by clicking Activate.
Installing Plugins
 Adding extra functionality or features to your website is simple too. Chances are a plugin has already been built that can do what you want.
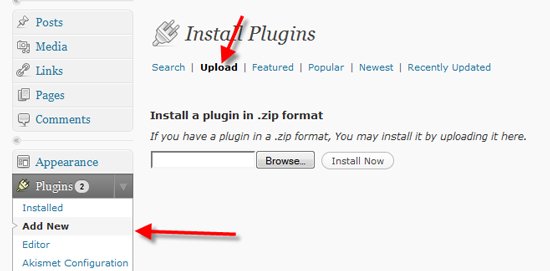
Searching for and installing plugins is snap by clicking on Plugins -> Add New on the left hand side menu.
Here are a few plugins I recommend installing on any new niche website. Remember, the trick is to keep your niche website simple so try to keep the number of plugins installed to a small number. All of these are available through the WordPress plugin dashboard.
- All-In-One SEO
- Essential for SEO and easy to use.
- Contact Form 7
- The easiest way to add a contact form to your blog.
- TubePress
- Easily integrate YouTube Videos into your website.
- Google Analytics for WordPress
- Easily integrate your Google Analytics account into your new site
- Google XML Sitemaps
- This plugin generates a sitemap for your website and also updates it when changes are made.
- Quick Adsense
- Easily insert Google Adsense into pages and/or posts. Great for passive income.
- Really Simple SSL
- It will automatically configure your website to use SSL to its fullest potential.
- WP Super Cache
- This plugin will cache the website helping to speed up load times when people visit the site.
Step 5: Create Your Content
Now that you have your website installed and configured, the last thing is to get it populated with content. Writing articles based on your niche keywords will help build search engine traffic over time. You will also need to populate it with affiliate programs and/or products related to your niche. Programs such as ClickBank, Amazon or individual affiliate programs can be used. It is recommended that you try to integrate the affiliate programs/products into your articles as well and you will be well on your way to producing passive income on your niche website.
If you want to save even more time, check out our prebuilt niche websites to instantly have a fully built and populated niche website.
Here are a few resources to get you started:

 Hello and welcome, my name is Jay. Over the past 10+ years I have built thousands of websites and I want to share everything you need to know about building and running Niche Websites.